
Key Takeaways
- Beyond Posts and Pages: WordPress Custom Post Types transform a basic blogging platform into a robust, enterprise-grade content management system (CMS).
- Plugin vs. Code: You can register custom content structures easily using a custom post type plugin WordPress developers trust, or by adding manual PHP code to your child theme’s
functions.phpfile.- Better Site Architecture: Implementing custom content types improves your website’s organization, backend administration usability, and frontend user experience.
- Boosted SEO Performance: Isolating niche content categories into dedicated CPTs with unique taxonomies creates tighter topical authority and cleaner URL structures.
- Advanced Layout Control: By pairing your custom posts with dedicated theme templates (
single-{post-type}.php), you gain complete design autonomy over how data displays.- Scalable Asset Management: Businesses can easily scale portfolios, e-commerce products, testimonials, and team directories without cluttering default post types.
Did you know that more than 43% of all websites on the internet are powered by WordPress? Pretty impressive, right? But here’s the thing: most business owners only use a small fraction of what WordPress can actually do.
They create a few pages, publish some blog posts, and, well, call it a day. That usually works fine in the beginning. But as the business grows, things can start getting messy. For example, if you’re running an online bookstore, a real estate directory, a recipe website, or a portfolio with hundreds of projects, trying to manage everything using only regular posts and pages can become a real headache.
Finding the right content takes longer, your WordPress dashboard starts to feel cluttered, and managing your website can take way more time than it really should.
This is where a Professional WordPress SEO Service can make a real difference by helping improve search rankings, increase organic traffic, optimize website performance, and strengthen your overall online visibility. But honestly, even the best SEO strategy works better when your website is built on a clear, well-organized structure from the start.
And that’s exactly where WordPress Custom Post Types (CPTs) come in.
Instead of forcing every type of content into the same format, Custom Post Types let you organize your website in a way that actually makes sense for your business. Think of them as custom content containers built specifically for different types of information. So, for instance, you could create separate sections for books, properties, recipes, team members, projects, testimonials, or pretty much anything else your website needs.
The result? A cleaner dashboard, easier content management, better scalability, and, of course, a website that’s much easier to maintain as your business grows.
In this complete WordPress CPT tutorial, we’ll break everything down step by step. You’ll learn what Custom Post Types are, why they matter, and how to create them from scratch. Whether you’d rather use a WordPress Custom Post Type plugin and avoid touching any code, or you prefer building everything manually with clean PHP, there’s a method that can fit your workflow.
By the end of this guide, you’ll have a clear understanding of how to plan, build, and organize a scalable WordPress website. More importantly, you’ll know how to create a structure that stays manageable as your content grows, supports better website performance, and gives your SEO efforts a stronger foundation.
Understanding WordPress Custom Post Types
What Are Custom Post Types in WordPress?
To understand how to create custom post types in WordPress, it helps to first understand how WordPress actually organizes content. Basically, almost everything stored in a WordPress database is treated as a type of post.
By default, WordPress comes with several built-in post types that handle different kinds of content. For example, you have Posts for regular, chronological blog articles, Pages for static or hierarchical content, Attachments for media files, and Revisions for previously saved versions or drafts.
So, what exactly is a custom post type (CPT)? In simple terms, it’s a new content type that you create yourself for a specific purpose. Think of it as giving a particular kind of content its own dedicated space within your WordPress website.
For example, instead of trying to manage everything as a regular post or page, you could create separate post types for products, properties, testimonials, team members, events, or case studies. This makes things much easier to organize and manage.
When you register a new custom post type, you’re essentially telling WordPress, “Hey, this type of content is different, so I want it to have its own rules and structure.” You can give it its own dashboard menu, editing interface, settings, permissions, and even unique styling.
At the end of the day, custom post types are what help turn WordPress from a simple blogging platform into a much more flexible and powerful content management system that can support business websites, directories, real estate platforms, eCommerce-related content, and even custom enterprise applications.
Default vs. Custom Content Types
The biggest difference between standard posts and WordPress custom content types really comes down to how your content is organized.
Standard posts are mainly designed for time-based content, like blog articles. For example, when you publish a new blog post, it usually appears at the top of your blog feed, with older posts listed underneath. You can also organize those posts using shared categories and tags.
Custom content types, on the other hand, work a little differently. Rather than being mixed in with your regular blog posts, they have their own separate section in the WordPress dashboard, usually with a dedicated menu item. Plus, they can use their own custom taxonomies, which makes it much easier to organize specific types of content.
So, for instance, you could keep your products, testimonials, portfolio items, or team members completely separate from your regular blog posts. Basically, everything has its own place. This not only keeps your WordPress dashboard cleaner but also makes your content easier to manage and helps prevent different types of content from accidentally getting mixed up on the front end of your website.
Real-World Use Cases for CPTs
When planning your site architecture, it helps to look at common WordPress custom post type examples used by successful online businesses. If you run an educational institution, you might need a “Courses” CPT. A real estate firm will require a “Properties” CPT with specific fields for pricing, square footage, and location.
| Business Industry | Custom Post Type Example | Associated Custom Taxonomies |
| E-Commerce & Retail | Products, Reviews, Coupons | Brands, Clearance Status |
| Entertainment & Media | Movies, Books, Podcasts | Genres, Directors, Authors |
| Corporate & Tech | Team Members, Case Studies | Departments, Industries Served |
| Medical & Health | Doctors, Services, Locations | Specialties, Insurance Accepted |
Why Your Website Needs Custom Post Types
Improving User Experience (UX)
Using specialized content silos can make a big difference in the overall user experience. Instead of making visitors dig through one huge blog filled with all kinds of different topics, you can create dedicated pages or sections for specific types of content.
For example, let’s say you regularly share customer success stories. Rather than mixing them in with your regular blog posts, you could create a separate “Case Studies” post type. That way, visitors can easily browse and filter those stories without having to search through unrelated content.
Honestly, this kind of structure just makes things easier for users. It helps them find what they’re looking for faster, reduces confusion, and can potentially lower bounce rates. Plus, when people can quickly access relevant content, they’re more likely to stay engaged with the commercial pages and information that matter most to your business.
Streamlining Content Management
For website administrators and content editors, a messy backend reduces daily productivity. If your team has to publish team biographies, portfolio items, and press releases within the exact same “Pages” panel, finding a specific document becomes a nightmare.
By executing a proper WordPress development tutorial framework, you create distinct, labeled buckets for every content department. A dedicated menu option like “Portfolios” keeps your workflow organized, simplifies permission settings, and ensures data remains uniform across your organization.
Unlocking Advanced SEO Benefits
From an organic search perspective, structured information is highly rewarded by search algorithms. By grouping related content under a specific post type, you naturally create highly focused silo structures. This architecture makes it easy to deploy tailored WordPress SEO services that optimize custom URL slugs like [yoursite.com/portfolio/project-alpha/](https://yoursite.com/portfolio/project-alpha/).
👉 Actionable Tip: Setting up clear URL structures prevents keyword cannibalization. It ensures search engines understand exactly which pages represent your core services versus your educational blog posts.
How to Create Custom Post Types via Plugins
Selecting the Right Plugin
For many website owners, using a plugin is the fastest and safest path forward. It eliminates the risk of breaking code while providing a clean, visual interface to handle complicated database registration details.
The clear industry standard for this task is Custom Post Type UI (CPT UI), trusted by millions of developers worldwide. Alternatively, advanced users often pick Advanced Custom Fields (ACF), which now includes built-in post type registration features alongside its custom field options. Both solutions offer robust safety, regular updates, and complete compatibility with modern block builders.
Step-by-Step Configuration with CPT UI
To begin, install and activate the Custom Post Type UI plugin from your official admin dashboard. Once active, navigate to the newly added CPT UI > Add/Edit Post Types menu item.
Step 1: Enter the "Post Type Slug" using lowercase letters and underscores only (e.g., "case_studies").
Step 2: Type the "Plural Label" exactly as it should appear in your menu (e.g., "Case Studies").
Step 3: Enter the "Singular Label" for individual items (e.g., "Case Study").
Step 4: Click the "Populate additional labels based on chosen labels" helper link to automatically fill out admin interface strings.
Step 5: Scroll to the settings block and click "Add Post Type".
Configuring Post Type Settings
After filling in your initial labels, you must customize the underlying technical behavior settings located further down the page.
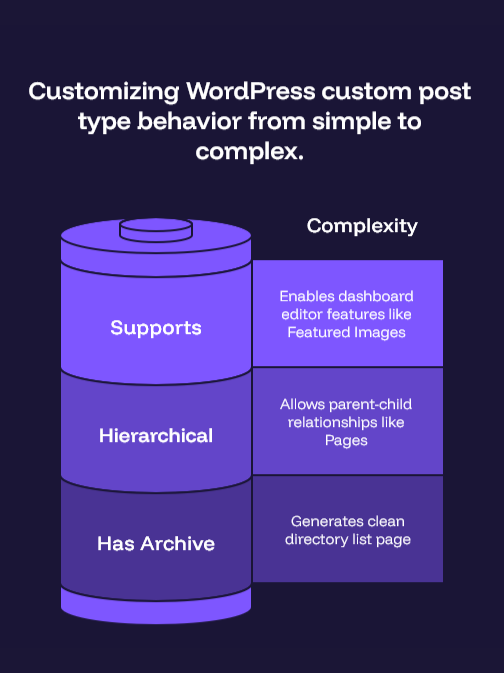
- Has Archive: Switch this parameter to
Trueif you want WordPress to automatically generate a clean directory list page at[yoursite.com/your-slug/](https://yoursite.com/your-slug/). - Hierarchical: Set this to
Trueif you want your custom items to behave like standard Pages, allowing you to establish parent-child relationships. Set it toFalseif they should mirror classic entries like blog posts. - Supports: Check all the dashboard editor features you need. This lets you turn on or off items like Featured Images, Excerpts, Custom Fields, Revisions, and Author selection blocks based on your project goals.
Registering Custom Post Types via Code
Setting Up a Child Theme or Function Plugin
If you want to keep your site lean and avoid unnecessary plugins, writing custom PHP code is an excellent strategy. However, never paste code snippets directly into your main parent theme’s files, as your changes will be completely erased during the next system update.
Instead, always use a properly configured child theme or create a site-specific functionality plugin. To get started with a child theme approach, use your preferred FTP manager or hosting control panel to open the functions.php file located inside your active child theme folder.
The register_post_type() Function
To safely build custom items with code, you will use the native WordPress utility function called register_post_type(). This function requires two primary arguments: the unique alphanumeric slug of your new content type, and an array containing configuration choices and admin text strings.
This core execution must always be hooked into the system’s init action cycle. This ensures your customized data parameters register properly before your database finishes loading and rendering the webpage components.
Writing the Complete PHP Code Snippet
Below is a clean, production-ready code template designed to manually build out a “Reviews” custom post type. Copy and paste this code block directly into the bottom of your child theme’s functions.php file:
PHP
function wpbadgers_register_reviews_cpt() {
    $labels = array(
        'name'               => _x( 'Reviews', 'post type general name', 'wpbadgers' ),
        'singular_name'      => _x( 'Review', 'post type singular name', 'wpbadgers' ),
        'menu_name'          => _x( 'Reviews', 'admin menu', 'wpbadgers' ),
        'name_admin_bar'     => _x( 'Review', 'add new on admin bar', 'wpbadgers' ),
        'add_new'            => _x( 'Add New', 'review', 'wpbadgers' ),
        'add_new_item'       => __( 'Add New Review', 'wpbadgers' ),
        'new_item'           => __( 'New Review', 'wpbadgers' ),
        'edit_item'          => __( 'Edit Review', 'wpbadgers' ),
        'view_item'          => __( 'View Review', 'wpbadgers' ),
        'all_items'          => __( 'All Reviews', 'wpbadgers' ),
        'search_items'       => __( 'Search Reviews', 'wpbadgers' ),
        'not_found'          => __( 'No reviews found.', 'wpbadgers' ),
        'not_found_in_trash' => __( 'No reviews found in Trash.', 'wpbadgers' ),
    );

    $args = array(
        'labels'             => $labels,
        'public'             => true,
        'publicly_queryable' => true,
        'show_ui'            => true,
        'show_in_menu'       => true,
        'query_var'          => true,
        'rewrite'            => array( 'slug' => 'reviews' ),
        'capability_type'    => 'post',
        'has_archive'        => true,
        'hierarchical'       => false,
        'menu_position'      => 5,
        'menu_icon'          => 'dashicons-star-filled',
        'show_in_rest'       => true, // Required to enable the Gutenberg Block Editor
        'supports'           => array( 'title', 'editor', 'thumbnail', 'excerpt', 'comments' ),
    );

    register_post_type( 'reviews', $args );
}
add_action( 'init', 'wpbadgers_register_reviews_cpt' );
Extending CPTs with Custom Taxonomies and Fields
Organizing Content with Custom Taxonomies
Just like default blog posts use categories and tags, your new custom content structures will likely need their own organization metrics. This is where custom taxonomies come into play. A taxonomy is simply a system for grouping related content items together.
For example, if you manage a “Books” post type, you can create a custom taxonomy called “Genres” containing terms like “Sci-Fi”, “Biography”, and “Mystery”. This keeps your library organized and gives users a clear way to sort through your content.
PHP
// Register a custom taxonomy called Genres linked to your Books post type
function wpbadgers_register_genres_taxonomy() {
    $labels = array(
        'name'              => _x( 'Genres', 'taxonomy general name', 'wpbadgers' ),
        'singular_name'     => _x( 'Genre', 'taxonomy singular name', 'wpbadgers' ),
        'search_items'      => __( 'Search Genres', 'wpbadgers' ),
        'all_items'         => __( 'All Genres', 'wpbadgers' ),
        'edit_item'         => __( 'Edit Genre', 'wpbadgers' ),
        'update_item'       => __( 'Update Genre', 'wpbadgers' ),
        'add_new_item'      => __( 'Add New Genre', 'wpbadgers' ),
        'new_item_name'     => __( 'New Genre Name', 'wpbadgers' ),
        'menu_name'         => __( 'Genres', 'wpbadgers' ),
    );

    $args = array(
        'hierarchical'      => true, // Set to true to mimic categories, false to mimic tags
        'labels'            => $labels,
        'show_ui'           => true,
        'show_in_rest'      => true,
        'show_admin_column' => true,
        'query_var'         => true,
        'rewrite'           => array( 'slug' => 'genre' ),
    );

    register_taxonomy( 'genre', array( 'books' ), $args );
}
add_action( 'init', 'wpbadgers_register_genres_taxonomy' );
Adding Metadata via Custom Fields
To build an advanced digital platform, standard text fields are rarely enough. If you are building a property portal, you need structured slots for details like price numbers, bedroom counts, and geolocation links.
Adding custom fields lets you attach specific metadata to your post types cleanly. While you can build these fields using native code, leveraging the Advanced Custom Fields (ACF) plugin makes it much easier to design beautiful, user-friendly input controls for your content team.
Displaying Custom Data to Front-End Visitors
Collecting structured data in the admin dashboard is only half the battle; your visitors need to see it on the front end too. If you use ACF to manage your custom metadata, you can use the the_field() function to display those values within your layout.
👉 Actionable Tip: To display custom fields inside theme files, use this code template:

<?php if( get_field('property_price') ): ?>
    <p class="price-tag">Price: <?php echo esc_html( get_field('property_price') ); ?></p>
<?php endif; ?>
How to Display Custom Post Types on Your Theme
Creating Custom Template Layouts
WordPress determines how to display individual posts using a standard template hierarchy. If a user visits an individual item from your custom post type, the engine automatically checks your theme folder for a file matching the name format single-{post-type}.php.
If you registered a post type named reviews, creating a template file named single-reviews.php allows you to design a completely bespoke layout for those reviews without touching your standard blog post design.
📁 theme-folder/
├── index.php
├── single.php (Used for default blog posts)
├── single-reviews.php (Used exclusively for individual reviews)
├── archive.php (Used for default archives)
└── archive-reviews.php (Used exclusively for the reviews directory)
Writing Custom Content Queries with WP_Query
If you want to display your custom posts inside standard pages, sidebars, or footer widgets, you will need to build custom database requests using the WP_Query class. This lets you query specific custom content types, sort the results, and limit post counts easily.
PHP
<?php
$args = array(
    'post_type'      => 'reviews',
    'posts_per_page' => 3,
    'status'         => 'publish',
    'orderby'        => 'date',
    'order'          => 'DESC'
);

$reviews_query = new WP_Query( $args );

if ( $reviews_query->have_posts() ) :
    echo '<div class="reviews-grid">';
    while ( $reviews_query->have_posts() ) : $reviews_query->the_post(); ?>
        <div class="review-card">
            <h3><?php the_title(); ?></h3>
            <div class="content"><?php the_excerpt(); ?></div>
        </div>
    <?php endwhile;
    echo '</div>';
    wp_reset_postdata(); // Important: Reset the global post loop data
else :
    echo '<p>No reviews found.</p>';
endif;
?>
Troubleshooting Common 404 Error Issues
A very common issue developers run into after registering a new custom post type is seeing unexpected “404 Page Not Found” errors when viewing their new pages. Don’t worry—this usually doesn’t mean your code is broken. It just means the site’s rewrite rules haven’t updated to recognize the new URL paths yet.
👉 Actionable Tip: To quickly fix 404 errors on new post types, navigate to Settings > Permalinks in your admin panel and click the "Save Changes" button. This forces WordPress to flush and rebuild its rewrite cache, instantly restoring your links.
Optimizing Custom Post Types for SEO
Formatting XML Sitemaps Correctly
To ensure your custom content gets indexation coverage on search engine result pages, your custom content types must be included within your XML sitemaps. Popular search optimization suites like Rank Math or Yoast SEO automatically detect active post types on your site.
Simply head over to their dashboard settings, locate the Sitemap Settings panel, and confirm that your new custom post types are toggled to display in sitemaps. This ensures search engine bots can discover your content updates automatically.
Configuring Schema Markup for Custom Content
Search engines rely heavily on schema structured data to understand the underlying context of your pages and generate rich snippets in search results. Standard blog posts use basic article markup by default, but a custom post type needs structured schema tailored to its purpose.
If you are publishing recipes via a CPT, you should assign specific Recipe Schema fields like prep time and ingredients. This helps search engines read your data accurately, giving you a major leg up in search rankings.
Managing Slugs and Permalinks for Maximum Value
Keep your URL structures clean, short, and focused on relevant keywords. If you are building an industry directory, your clean URL string should look like this: [domain.com/portfolio/project-name/](https://domain.com/portfolio/project-name/).
Avoid complex nesting levels or generic terms like [domain.com/stuff/project-name/](https://domain.com/stuff/project-name/). Clean, keyword-rich permalinks help search engine crawlers understand your site structure while building trust with real human users clicking through search results.
Need Expert WordPress Development Support?
Configuring advanced custom architectures and optimizing database performance requires precision and deep technical expertise. If you want to scale your platform smoothly without dealing with broken code or performance bottlenecks, the team at WP Badgers is here to help.
As a premier digital strategy agency, we have helped over 80+ businesses grow online by engineering custom, high-performance web platforms built for long-term success. Contact WP Badgers today to transform your digital presence.
Get Started Today
We are always here to
help you achieve the unimaginable

Frequently Asked Questions
How many custom post types can I create in WordPress?
There is no hard limit on the number of custom post types you can create. You can build as many as your project requires. However, focus on clean database organization and ensure your server has the hardware resources to handle extensive queries efficiently.
Will custom post types slow down my website loading speeds?
No, custom post types themselves will not slow down your website. They use the same core database tables as standard posts and pages. Performance issues only arise if you run poorly optimized queries, use inefficient code loops, or install bloated plugins.
Can I convert standard blog posts into a custom post type?
Yes, you can convert standard posts into a custom post type. The easiest way to handle this is by using a migration utility plugin like “Post Type Switcher”. This allows you to quickly change content types right from the editor dashboard.
Do custom post types work with modern page builders?
Yes, modern visual editors like Elementor, Divi, and the native Gutenberg block editor fully support custom post types. You just need to check the plugin’s settings panel to ensure the builder interface is toggled on for your specific custom post types.
What is the difference between a custom post type and a taxonomy?
A custom post type represents an independent data group (like “Books” or “Events”). A taxonomy is an organization system used to categorize and filter those items (such as grouping books by “Genre” or events by “City”).
Why am I getting a 404 error on my new custom post type pages?
This usually happens because the site’s URL rewrite rules haven’t updated to include the new post type yet. To fix this, simply head over to Settings > Permalinks in your admin panel and click “Save Changes” to flush the rewrite cache.
Should I use a plugin or write code to create custom post types?
Using a plugin like CPT UI is fast, visual, and great for beginners. Writing custom PHP code within your child theme is ideal for developers who want a lightweight setup, complete control over their code, and fewer plugins to manage.
Conclusion
Mastering WordPress Custom Post Types can really change the way you manage your website. Instead of trying to squeeze every type of content into regular blog posts or pages, you can create dedicated content types that keep everything organized and much easier to manage. Honestly, this becomes especially helpful as your website and business start to grow.
The thing is, when you combine Custom Post Types with custom taxonomies and tailored templates, your content becomes easier to organize and navigate—not just for your visitors, but for search engines as well. So, you’re not simply making your website look cleaner. You’re actually building a more flexible and scalable foundation that can support better SEO and a smoother overall user experience.
And that’s where a Professional WordPress SEO Service can really make a difference. A well-planned SEO strategy can help improve your search rankings, bring in more organic traffic, optimize your website’s performance, and strengthen your overall online visibility. More importantly, it focuses on steady, long-term growth rather than quick fixes that may only work for a short time.
The good news is, you have a couple of options. If you prefer to keep things simple, you can use a beginner-friendly plugin and take a no-code approach. On the other hand, if you want more control and customization, you can build everything with clean PHP code. Either way, keeping your content properly organized pays off in the long run.
At the end of the day, a well-structured website makes publishing easier for your team, helps visitors find what they’re looking for without unnecessary hassle, and gives search engines a clearer understanding of your content. And, of course, that creates a much stronger foundation for a successful, long-term SEO strategy.